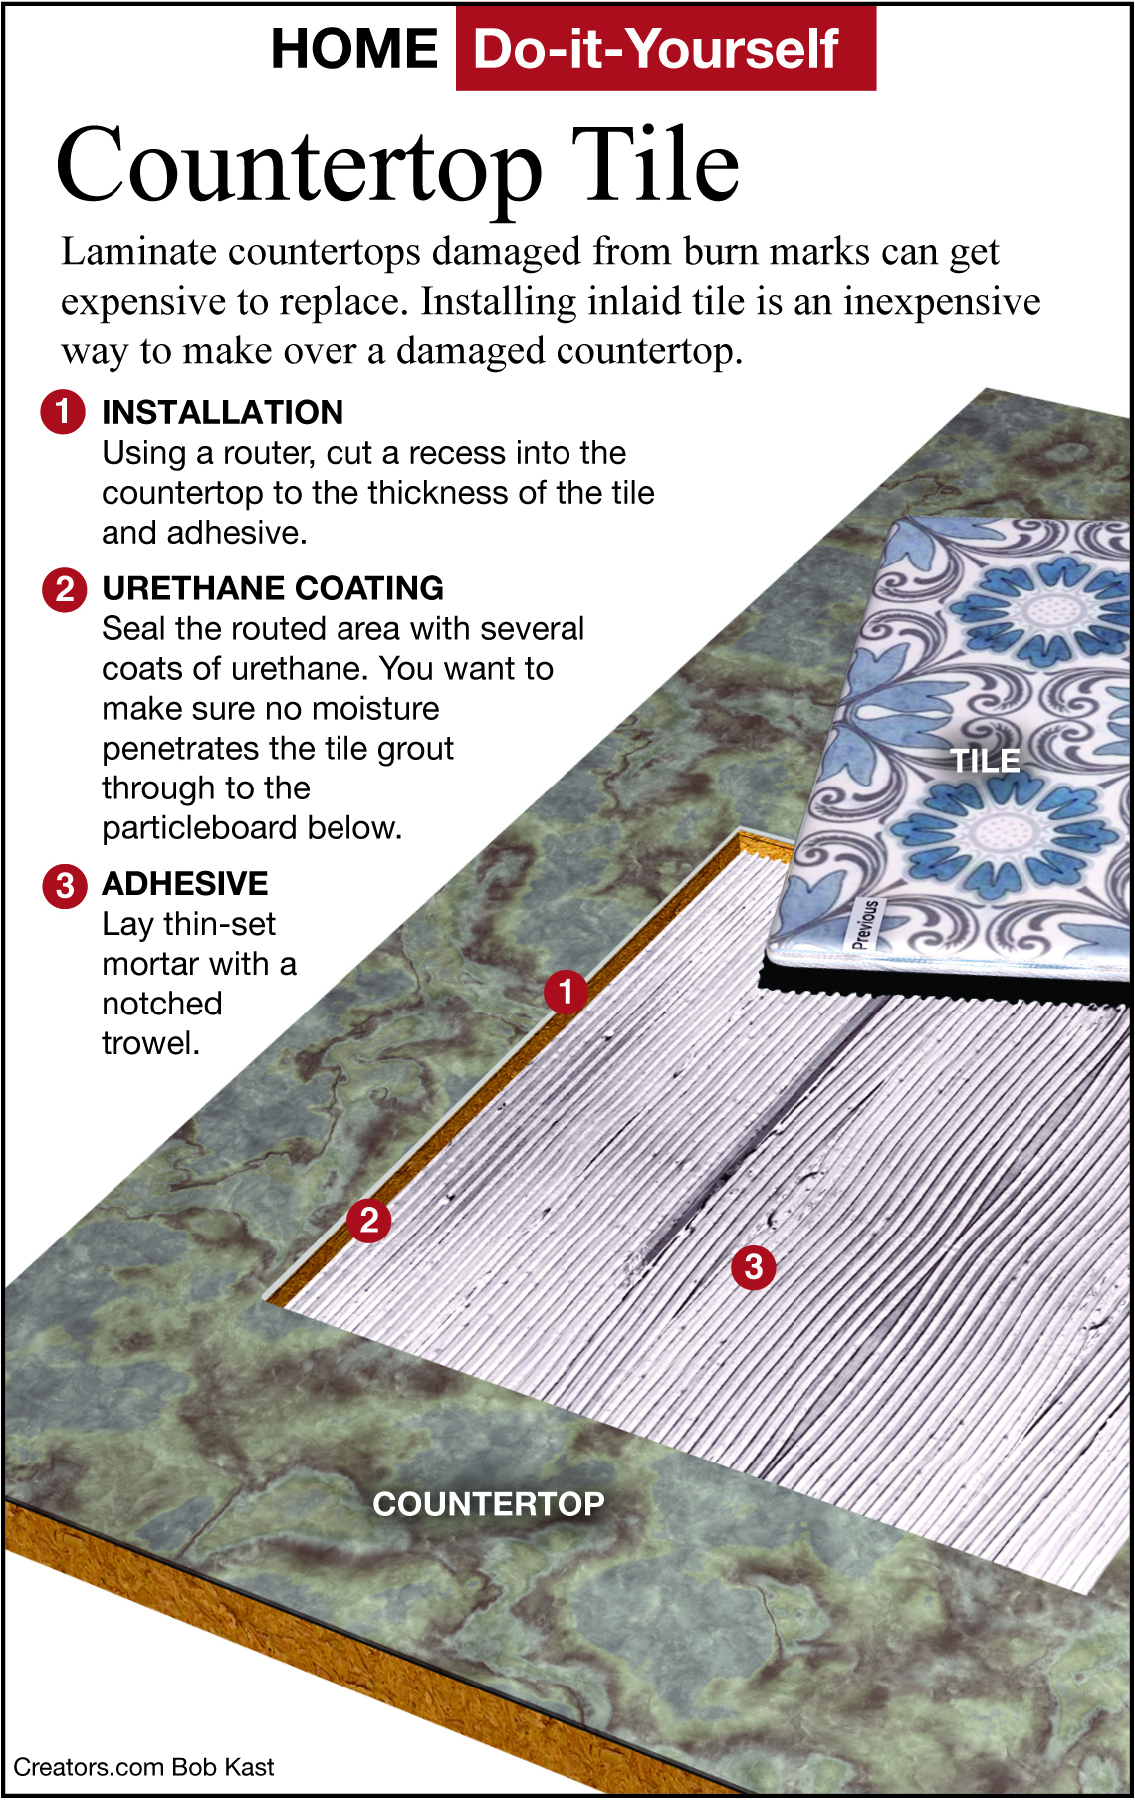
Here's How: Renovate Countertop With Inlaid Tile
Dear James: I have damaged my new laminate countertop by placing a very hot pot on it. Is there a way to repair it myself without going to the expense of replacing it again? -- Maria T.
Dear Maria: Laminate countertop materials are very durable, but they can be damaged by the application of heat from hot cooking utensils. It may just weaken it so it wears faster or discolor it immediately. Fortunately, there is a relatively simple method to fix the bad spot and actually improve the overall appearance.
Removing the damaged spot and inlaying ceramic tiles is the best repair option. Since that spot on your countertop seems to be a natural location to place hot pots and pans, heat-resistant ceramic tile is an excellent material to use. It is available in a huge range of colors, sizes and patterns, so you can create any look you prefer.
The first step is to measure the damaged area to get a rough idea of the size of tiles that will fit in neatly. Since you are not an expert at laying tiles, it would be wise to select a medium-size tile and plan on fairly wide (1/4-inch) grout joints. Wider joints allow for a greater margin of error in spacing without it being apparent.
Although any type of ceramic tile will work in this type of countertop application, it would be wise to avoid very glossy tiles for your countertop. Since your children will be placing metal pans on them, and children are not always careful, tiles with a standard dull-glazed finish will hide any resulting fine scratches better than tiles with a glossy surface.
Once you have purchased the tiles, place them in their exact finished positions over the damaged spot. Draw a line on the countertop around them, remembering to leave space for the grout joint around the perimeter.
If the damaged spot is more than one-third the width of the countertop, you should reinforce the countertop for strength. Using construction adhesive, glue a piece of plywood on the underside of that spot. Run it the full width of the countertop or overlap the damaged spot by at least 6 inches. Use some short two-by-fours to brace it up tightly until the adhesive sets.
Go to your local tool rental shop and get a small electric router with a 1/4-inch carbide bit to rout out the damaged area and make room for the tiles. Set the router depth to the thickness of the tiles plus 1/16 of an inch. This will allow room for the tile adhesive so the tops of the tiles will be flush with the countertop.
Place the tiles in the routed area again to double-check the spacing. If all looks good, remove the tiles and paint the recessed area with several coats of clear urethane sealer. This is a precaution against water reaching the particleboard base. Make sure to coat the sides of the area, too.
Several types of tile adhesives are available, but cement-based thinset is generally the best to use. Organic adhesives are simple to apply, but they are not as strong and rigid as thinset. Pots full of water can put a lot of stress on the tile area.
Once you have gotten to this point, the worst of the job is over. Finishing it with a sanded grout will work best for this repair. A light-colored grout looks good with most colors of tile. This type of grout also cleans easily with bleach or a bathroom tile cleaner if it gets discolored over time.
========
Send your questions to Here's How, 6906 Royalgreen Dr., Cincinnati, Ohio, 45244 or visit www.dulley.com. To find out more about James Dulley and read features by other Creators Syndicate writers and cartoonists, visit the Creators Syndicate website at www.creators.com.
Copyright 2025 Creators Syndicate Inc.


Comments